Progress Bar Strategies for Java SWT

Continuing the series on developing applications in Java using SWT, I’d like to address the problem of implementing progress dialogs for long-running operations. The last time I was on the topic of SWT, I explained how I implemented a sash in my GUI.

This application processes potentially large datasets, which can be very time-consuming operations (anywhere from a few seconds to several minutes or more). The demo and early iterations of the project simply became unresponsive after the user chose a dataset, and remained unresponsive until the processing was complete. The obvious thing to do here is to implement a progress dialog that gives the user a visual indication that the application has not hung, and, ideally, provides the capability to cancel the operation.

This turned out to be a bit more difficult than I anticipated, so I thought I’d relate my experiences.

Phase 1: Modal Pop-up Dialog

This part is not difficult. To make things reusable, and to make the follow-on phases easier to implement, I created a DialogProgress class. The constructor accepts two strings (one for the dialog title, one for the text inside the dialog), and creates a new shell with a ProgressBar widget. I made it the ProgressBar widget private, and added an update(finished, outOf) method to DialogProgress for updating the widget. The dataset processing routine just calls update() each time it finishes processing an entry in the dataset (for example, invoke update(5, 10) to indicate that you just finished processing the 5th entry in a dataset with 10 entries).

Of course, now that you have a progress dialog up and going, the next obvious step is to stick a cancel button on it.

Phase 2: Allow Canceling

Here’s the catch: adding a button to the progress bar dialog means that something needs to be listening for the mouse click. The dataset processing, then, should move into a separate thread, so that the main process can enter the display.readAndDispatch() loop.

My initial thought was to have the main application start the thread and execute a wait(). Then the thread would signal its completion by invoking signal(). The problem is that the main application does not enter the display.readAndDispatch() loop because it is busy waiting… the new “cancel” button can’t be clicked.

The most elegant solution that I came up with was to provide the ability to register processingComplete and processingCanceled listeners with a dataset processing object. The main process instantiates a dataset processing object, registers a processingComplete listener and a processingCanceled listener with it, and then invokes the run() method of the object to start the thread. There is no need to wait anymore; the main process simply returns to the display.readAndDispatch() loop.

Now, if the user clicks the “cancel” button, the dataset processing object will invoke the processingCanceled listener. If the dataset processing finishes without interruption, the processingComplete listener will be invoked just before the thread exits, and the main process will know to update the UI with the results of the processing.

Phase 3: Eliminating the Dialog: Asynchronous Updating

I haven’t actually gotten to this point with this application yet, but I believe this will be the next iteration. I plan to eliminate the modal progress dialog, and move the progress bar to the status bar on the bottom of the main shell. This way, the dataset can be shown as it is loaded, meaning that the user can begin reviewing the first entries in the dataset while the later entries are still being loaded. I’ll post again if I ever get around to implementing this iteration!
Using the Sash Widget in Java SWT

This is the first in what will be a series of posts detailing some of the problems I ran into when developing an SWT-based GUI in the Eclipse development environment.  I hadn’t developed a GUI in Java since Swing was the new hotness, so SWT was new to me.

Sash Layout Overview

Layout Overview

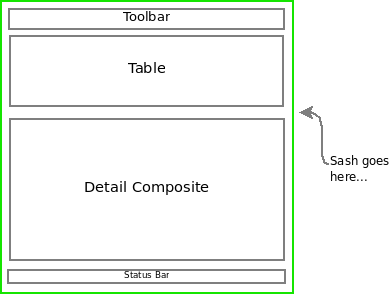
The main window design called for a toolbar across the top, a table which lists entries from a database, a composite under the table which provides details on the selected entry, and a status bar on the bottom.  It was easy enough to position the widgets using a GridLayout, but I wanted the user to be able to adjust the relative sizes of the table and detail composite, giving either more or less screen real estate to whichever of the two widgets is of the most interest at the moment.  I suspected that a sash was the way to do this, but the SWT snippet library, which is very useful in most cases, contained surprisingly little information on the use of sashes.  After some experimentation, here is what I learned.

Part of the problem was that I was using a GridLayout for the main shell.  Once I switched to using a FormLayout, the sash became trivial to implement.  (This article on layouts is spectacular, by the way.) With the GridLayout, I instantiated the widgets in order from the top to the bottom of the shell, but when I switched to a FormLayout I needed to change the order in which the widgets were created.

The first step when laying out the widgets is to position the sash:

    final Sash sash = new Sash(shell, SWT.BORDER | SWT.HORIZONTAL);
    formData = new FormData();
    formData.top = new FormAttachment(30, 0);
    formData.left = new FormAttachment(0, 0);
    formData.right = new FormAttachment(100, 0);
    formData.height = 3;
    sash.setLayoutData(formData);

When the application is started, this sash is positioned in such a way that 30% of the window space is provided for the toolbar and table at the top of the window, and 70% is provided for the detail composite and status bar at the bottom.

At this point, the general idea is to place the widgets from the top of the shell down, until you reach the sash.  Then you place widgets from the bottom of the shell up, again until you reach the sash.  In my case, I instantiated the toolbar first and attached it to the top of the main shell.  Then I created the table and attached the top of it to the bottom of the toolbar, and the bottom of it to the top of the sash.  The next step was to start at the bottom of the shell by attaching a composite for the status bar to the bottom of the main shell.  Then I attached the bottom of the detail composite to the top of the status bar composite, and the top of the detail composite to the bottom of the sash.

With that updated layout, the selection listener for the sash became relatively simple:

    sash.addListener(SWT.Selection, new Listener () {
        public void handleEvent(Event e) {
            sash.setBounds(e.x, e.y, e.width, e.height);

            FormData formData = new FormData();
            formData.top = new FormAttachment(0, e.y);
            formData.left = new FormAttachment(0, 0);
            formData.right = new FormAttachment(100, 0);
            formData.height = 3;
            sash.setLayoutData(formData);
            shell.layout(true);
        }
    });

When the sash is moved, this listener causes its layout data to be replaced.  The top of the sash is set to the user-specified location, and the layout() method of the shell is invoked, which will cause the table and detail widgets to be resized to accommodate the new sash location (since they are attached to the sash).

Obviously, it’s easy to modify this layout strategy for vertical sashes.  It does get a bit more complex if you want to have multiple sashes in the same window, but even that is not too bad: if I had wanted a vertical sash in the detail composite, I could have simply used a form layout within that composite, building widgets from the left and right sides of the composite until they met the sash in the middle.

So there you go:  a quick summary of my experience with the elusive sash widget.